Showing posts with label slotted tension rods. Show all posts

Tuesday, January 26, 2016

Beverley Script Badge Drums

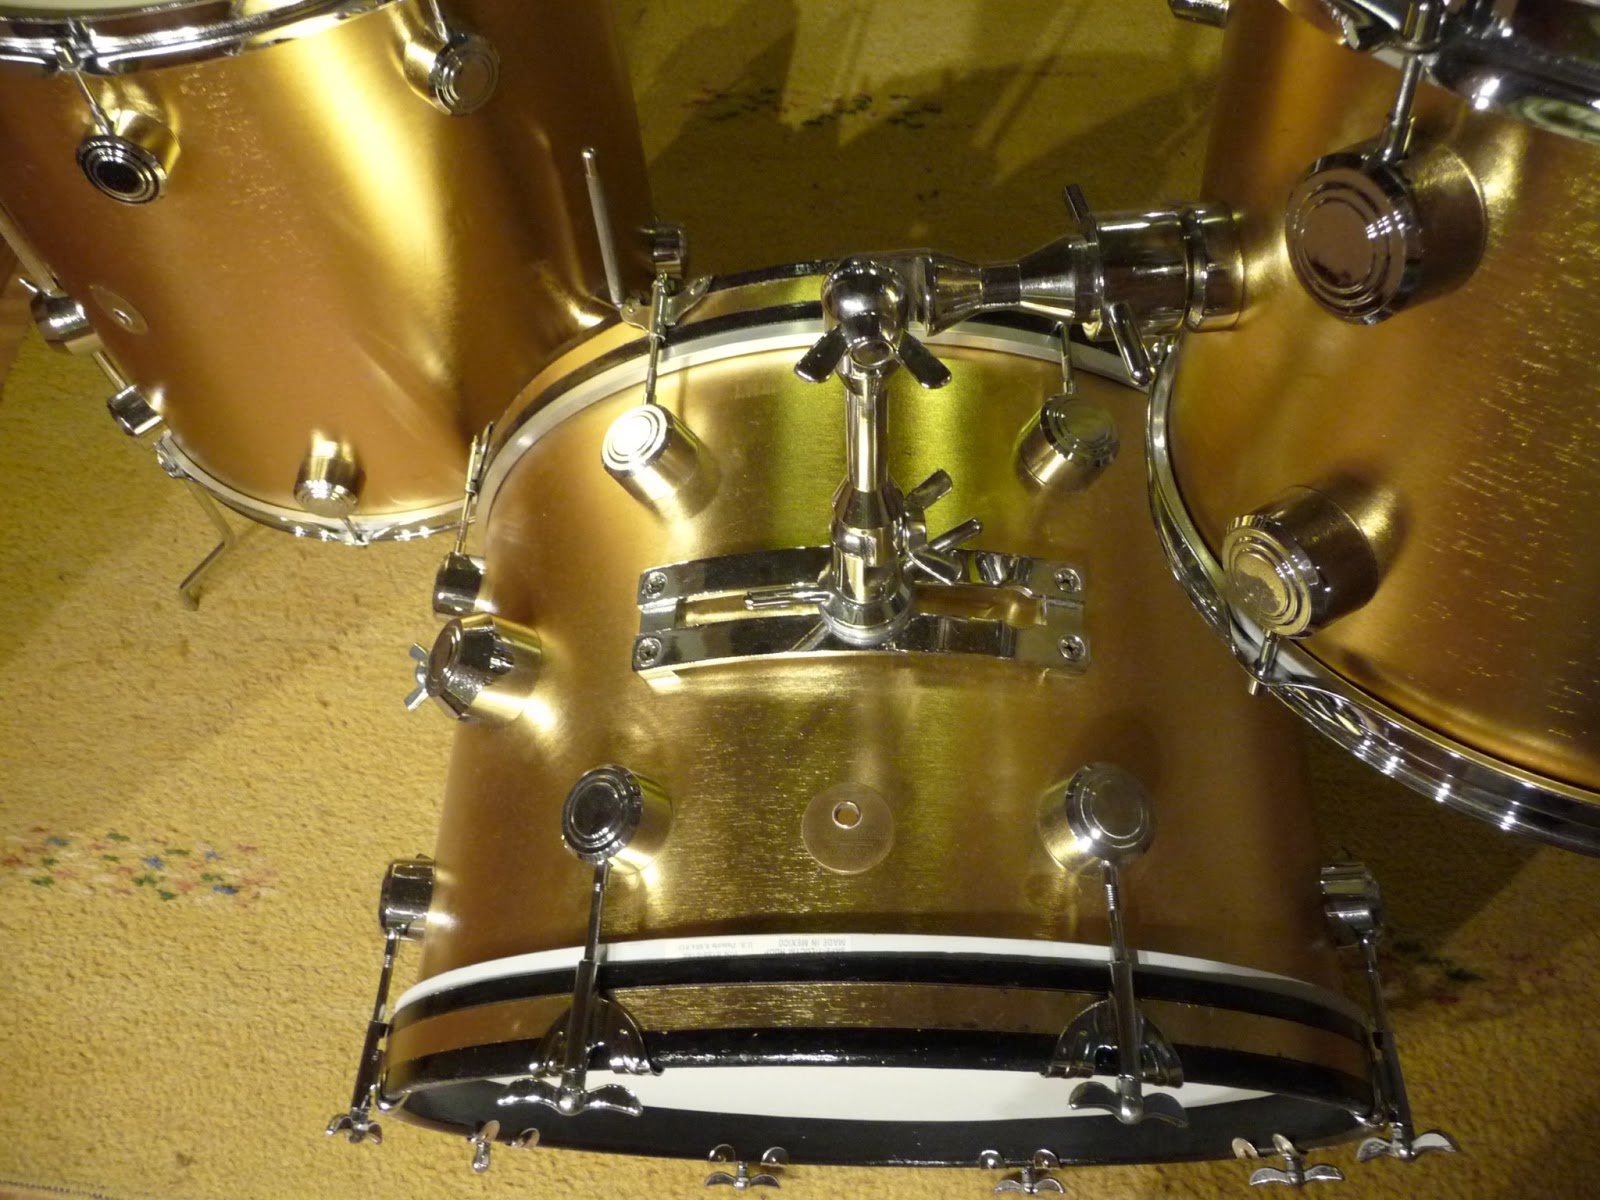
Every so often we buy what looks like a hunk of junk and try to turn it into a playable kit -- or even a nice kit. A few months ago (autumn 2015) I bought a Frankenstein kit consisting of two "script badge" era Beverley drums (pre-international birch with earlier lugs, 12x8, 16x16) and one later Blue Badge era (mahogany, later lugs, 20x14).

SPOILER ALERT: If you want to see the end result now, scroll to the bottom and then come back up here. Main idea: These old Beverley pre-international drums are fantastic.

Also, before I get started, I want to correct some misinformation that's out there on the net: Beverley made Pre-International sizes. Don't let anyone tell you they didn't. They did.

So back to FRANKENSTEIN, as I call him/her/it/them. Here's what the drums looked like...


Notice the following major detractors:
  • Horrible sticky-foil "wrap"
  • Later B&H era Beverley badges
  • Extra holes in kick (typical of Premier and Beverley that originally had disappearing spurs, particularly when on a mahogany shell)
But also a few items that gave me hope:
  • Lugs seemed to be in nice shape
  • Chrome generally looking tolerable
  • Original slotted rods and kick rods
  • No extra holes in toms 
  • Original "tall boy" hoops in decent condition

When I took possession, I quickly peeled back the horrible foil "wrap" to find shells in OK condition, but covered -- COVERED -- in nasty glue.


To make a very long story short, this crap did NOT want to come off easily. I had to use gel-type paint remover to get it off, but the shells remained stained.

The birch drums fared a bit better:


But the mahogany had quite a bit of glue stuck in its deeper grain:

Some outer ply came off on the floor tom. Notice the dark middle ply. MAHOGANY. Pretty obvious that this is a birch-mahogany-birch drum. That made me pretty happy. I ended up filling the "holes" pretty easily with wood paste. I've read that wood paste can crack on drums. Hopefully it will hold up. I'll report back if it doesn't.


Once I finally got the drums cleaned and sanded, I had to decide how to finish them. Since the drums are mixed (birch toms, mahogany kick) I couldn't really oil them (no natural finish). The most obvious thing to do would have been re-wrap. But as you probably know, decent wrap is expensive. I promised myself not to spend too much on this job, so I ruled out wrap.

Instead I opted to use natural SHELLAC mixed with BRONZE POWDER. You see, I had some materials leftover from my recent clean-up of my Golden Sun Premier B303, so I thought I would use them on Frankenstein.

The process is pretty simple: You simply dissolve the bronze powder in the shellac and start brushing it on. You have to make sure the powder is evenly dissolved, and you have to use a quality brush: The finish is only as good as your brush.

This is an intermediate stage. Notice it's still pretty ugly.

I applied many layers - probably about six. I did not sand between layers since I found that too much material came off during sanding, even with 600 grain.

The final stage was to spray with Talens Acrylic Varnish (Glossy 114). This gave the drums a touch of shine and smoothed over a few of the imperfections. Overall I ended up with a pleasant finish. We'll see how it holds up. The other day a bandmate hit the kick with a mic stand and the drum came out unscathed. So far so good.

Here are some shots iof the finished kit. Pardon the mismatched kick hoops. I used what I had around.


And here's an original badge as well as some that I printed with a 3D printer. They look alright, but aren't quite up to my standards. The main problem is finding a way to fix them to the drum. I need to make some time to visit a screw and nail shop. I'm sure there's a solution.


Tuesday, December 2, 2014

Premier Hi-fi COB snare (1967-1970): The Odyssey

Some of you know the buzz of excitement when you find
Hi-fi: The drum that got me going...
an interesting drum for sale. You smell a potential score that will fill a hole in your collection, and you start to tingle. You check a few photos, ask a few questions, and you turn to the Holy Drum Geek Triumvirate for answers: Friends, Facebook, and Forums. And then you jump.

In this post I'll share what I've learned about late-60's Premier metal snares. Some of this stuff I knew, but most of it I learned while trying to figure out exactly what I had bought without having ever seen it in person!

Feel free to comment or send me a note if you know more about anything I claim here or anywhere on this blog!


What makes a Hi-fi a Hi-fi?

In case you're new to Premier snares, the Hi-Fi is a late 60's addition to the Premier line. It came in wood and metal (see below) with a standard strainer (called a 632, I believe), as opposed to the more common parallel strainer offered on most other Premier snares at the time (like the earlier Royal Ace or the Hi-fi's contemporary, the 2000).

Metal is metal is metal

1969 Catalog Page
In this post I'll only look at the metal version of the Hi-fi. (For info on birch v. mahogany, check my Beverley article.) Take a look at most pre-1970s Premier catalogs and you'll find that their metal snares were made of... well... metal. What kind of metal? That's another story. Metal is metal, right? At least it was in the good old days!

Here's a page from the 1969 Premier catalog. Notice that the lower Hi-fi is made of... Metal. (Insert smiley here). And look a bit lower down this blog post at the 1972 catalog. By 1972, clearly the Hi-fi has changed, but it's still made of... you guessed it: Metal.

I scoured lots of sites and the Premier experts seem to agree that the metal for most pre-1968 Premier snares was brass. But once we get past 1968 or so (during the transition from Pre-International to International size shells) you also find lots of references to aluminium Premier snares. That is, pretty soon after introducing "metal" Hi-Fi's, Premier switched from brass to aluminium as their metal of choice. Why change? I hate to be cynical, but based on what I've read about the history of Premier (and all other major drum brands from those days) it must have been a cost saving measure. 

1972 Catalog Page

What about the badge? Dating?

So like I mentioned, you can tell a Hi-fi by the strainer. That's the easy part. But what year is my Hi-fi? Is it an earlier brass drum, or maybe a later aluminium?

With Premier, badges can tell a lot, but not everything. For example, look at the 1969 catalog above. Notice that there are two different badges on the same page. The wooden drum has the newer badge, while the metal drum has the older badge. Hmm... in fact, even in the 1972 catalog we see the same "different badge" effect, but this time with the wood and metal switched.  

Either way, for my purposes it was clear that my drum must be from somewhere after 1967 or so when this "new badge" was introduced (even if nobody told the folks who made the catalogs for Premier).

Most confirmed brass Hi-fi's seem to have come with the older badge and often had the Hi-fi name on the badge, so at first I suspected my drum was a later 1970's model, and likely aluminium. I felt better when I learned that the "new badge" came without a serial number until 1970. Assuming that's the case, it seemed safe to assume that my drum is from 1967-1970. (Side note: Serial numbers at Premier don't help with dating since they were only provided to allow you to track your assets for insurance purposes.)

(Also note that I'm focusing on a very short period here from 1967 into the early 70's... I won't discuss earlier or later Premier badges.)

Lugs and Beer Barrels 

Some examples of  Premier die-cast hoops 
Obviously my drum had 10 lugs. Since later Hi-Fi's were often 8-lug, I considered this encouraging.

Next I noticed that my snare has a tighter, rounder style die-cast hoop, which I learned is called Beer Barrel. It was the standard Premier hoop in the 60's and before (feel free to add detail in the comments below). After that, perhaps by 1972 or so, the design changed slightly to what many call Streamline hoops. All veteran Premier-watchers know this like they know mahogany from birch, but it's something I had never noticed. Maybe you had never noticed either? Maybe you care? :-)

Anyway, this little piece of Beer Barrel evidence got me excited. From what I know about Premier (and Rogers and others), after a major transition they would use whatever old components they had on hand (shells, badges, labels, lugs, hoops, etc) until they were gone. So I was thinking that I must have old hoops with a new badge.

The hoops, by the way, are non-magnetic. If you can believe what you read, they are made of mazak, part of a family of alloys with a base metal of zinc and alloying elements of aluminium, magnesium, and copper (thanks, wikipedia). 

And the shell?

I bought the drum based on this photo and  a few more
So back to the shell. As you can see, my drum shows a few scratches, but no pitting. Seasoned snare collectors know that it's rare to find an older chromed aluminium snare that doesn't show at least some pitting. Even my very pristine Cosmic 21 shows some very minor pitting. This drum (my Hi-fi) showed no evidence of the usual aluminium pitting.  And following the logic of "old hoop, new badge" I ended up thinking I must have old hoops, new badge, old shell. That is, I must have a "leftover" brass shell, or simply from the days before they introduced aluminium.

And the sound?

So finally the drum arrived! At first I was concerned because a household magnet gave the ever-so-slightest resistance. Barely noticeable, but confirmed by my friend as something real. Nonetheless, folks in my community (Friends and Facebook) confirmed that a magnet sticks to steel like it sticks to your fridge, and that I shouldn't worry about la resistance. I also read that chrome plating can also cause minimal pull.

When I finally played the drum (with original Everyplay heads top and bottom), it became quite evident that it's indeed brass, as most of the Facebook Premier guys had told me it would be. It has "that" brass sound -- quite round with a nice "donk" to go along with just enough crispiness. I'll try to post a sample as soon as possible, but the current video on YouTube of an earlier Hi-Fi brass (not mine) gives you the idea (posted below).
One tidbit of info I am missing: I'm thinking there must have been a change in tone control that helps folks date their Premier drums? I can't find any details, so if you have some info, please comment or drop me a note. 

The Cleanup

All cleaned up
I took the drum apart, probably for the first time in its lifetime. The drum was very well cared for, and only one slotted tension rod and insert showed some rust. The lugs are nearly perfect, with one or two scratches here and there on a few lugs. It weighs in at 1952 grams with lugs, strainer, and butt attached. Each lug is 61 grams, so stripped to strainer and butt it's about 1300 grams. There is one ding on the bottom edge and the badge has what we might call a tear. But for a 45 year old piece of equipment, I'd say it's looking fine. I can also mention that there's a very smooth weld. Nicely done. Superior to the weld on my ~2010 George Way (Dunnet) Bronze snare.


Not my video, but gets the idea across very well!


Thursday, July 18, 2013

Hayman Vibrasonic 2221 Pacemaker in Gold Ingot

A few months ago I took delivery of a Hayman Vibrasonic kit in Gold Ingot. Three pieces: 13-16-20.

My research tells me it's a 2221 Pacemaker (sans snare) with a 20 x 13 kick (yes, 13", with 8 lugs) and a Hayman brass badge (not George Hayman), dating it to 1969-1973.

It needed some work and was missing some parts, but I've polished up the chrome and badges, painted the hoops, and bought some missing bits. I'm not claiming to be an expert, but here are my thoughts on Hayman drums after taking this kit apart and making it nice again.


Shells
  • The shells appear to be birch and are among the thinnest I've seen. 
  • The Vibrasonic coating on the floor and kick are crazed, but not the 13.
  • The kit has no extra holes anywhere, with original baseball bat dampeners. 
  • In some places the lugs have worn into the outer ply a bit, but it doesn't seem to have caused any problem. I considered adding rubber gaskets between lug and drum, but had trouble finding any that would fit. 
  • The floor tom had some splitting at the bottom reinforcement ring. As most of you probably know, it's not a big job to glue a re-ring, so it was easy to fix.  
  • The toms are slightly over-sized, but not out of round. Some standard heads go on the toms, but Aquarian American Vintage have proved to be the best solution for ease of tuning.
  • UPDATE: I bought some Evans Level 360 G1 heads and they went on easily and tuned up in a flash. I'm thrilled since now I have some flexibility choosing heads.
  • The badge is slightly loose on the 13"
  • I polished the brass badges for many, many minutes each with automotive chrome polish
Regarding crazing, I got some nice info from a UK drum builder who asked to remain nameless. Here's what he told me in an email:
The paint Hayman used to use is a thick polyurethane and sets very hard like cement. 8 out of 10 Hayman drums do crack inside as the paint does not move with the shell (it was a stupid idea -- I told Ivor Arbiter at the time). If I was you i would just live with it. These are great old drums. 

Wrap
  • The gold ingot wrap is looking fine for its age. A few scuffs here and there, but nothing deep, and no splitting. 
  • It's a high quality wrap, I'd say. It has indeed held up to the test of time. Interesting that some folks on Vintage Drum Forum commented that Hayman wraps don't hold up. This one really looks great, as these unedited photos will show. 
  • First I washed them with unscented soap and water with a cotton t-shirt, and then I polished them using Turtle Wax dashboard cleaner.

Hoops and rims
  • Kick: I had to sand and repaint the original kick drum hoops and glue the gold ingot inlay in a few places. I used standard glossy black paint from the hardware store. Nothing fancy, and I know I'd get a better finish with spray paint or an air gun. Maybe I'll get around to that later. 
  • The kit came with original rims for the 13 and 16, so I have non-original replacements (Gibraltar) for the reso side. Hayman toms are standard sizes (if slightly oversized), so any rims will do.
  • The Hayman rims are solid and similar in weight to modern Gibraltar. Certainly a stronger build than Beverley rims from the same era.
  • I cleaned the original rims with vinegar and aluminum foil. It really melted away the rust. 

Tension Rods, Lugs
Probably the strangest thing about the Hayman Vibrasonic is the tension rods.
2221 Pacemaker - Thumbs up!
  • Hayman rods are slotted, like most vintage UK drums, but smaller gauge (smaller around) than other rods out there. The kit only came with top heads, so I was missing some rods and few swivel nuts. I had to buy original replacement rods and a few nuts from the UK at somewhat of a premium. I found this easier than swapping out for modern-size swivel nuts and rods. Also, I wanted to try to keep the kit as original as possible. 
  • I only had eight original kick rods and claws, so I used modern replacements (Cannon). That was easy enough since the kick swivel nuts are standard size. Go figure. 
  • The lugs are a bit scraped with some pitting. I cleaned them up with vinegar and aluminum foil and got them into pretty good shape.  
  • Hayman lugs/inserts are the old spring-loaded kind. I decided to pack a piece of foam in each lug to prevent noises (like used in cheap mattresses or furniture). I'm not in love with the spring since the nut has a tendency to push down when you don't expect it to. But it's not really a big issue.

Spurs
With custom logo and Pearl suspension feet on Danmar Ludwig spurs
The kit did not come with kick spurs, so I ordered 9.5mm Danmar Ludwig replacement spurs. They are actually a tiny bit short for the Hayman, so I extended them using Pearl suspension feet. Solid as a rock now, with a little help from a Gibraltar kick anchor just to be sure.


The Knuckle Cruncher 
Some call it the Knuckle Buster, some the Knuckle Cruncher. But indeed, now I see why the infamous Hayman tom holder has such a bad reputation. As others have described, it's a strange device with "a mass of joints, thumbscrews and ring screws mounted on a consolette-style rail."  It looks great, but it is indeed a pain in the butt and doesn't allow much flexibility in positioning.  I'm glad I have one since it adds some value to the kit. But I gotta say, it's not the easiest beast to use.

Sound - VERY Quick Demo
Here is a very quick demo made in the living room of my apartment at low volume - out of consideration for the neighbors. Recorded with a single Audio-Technica ATR 25 stereo mic with a Canon HD10 camera. While the video is short, it demonstrates the nice warm tone you get with the American Vintage heads.


Dating the kit
I'm no expert by any means, but evidence I've collected from various sources online suggests that my kit is from 1969, and likely a transitional kit from George Hayman to simply Hayman.

Later Hayman kick claw/rod
Early Hayman kick claw/rod
For example, it seems Hayman kick drum claws and tension rods looked like this (left) in the early days. Then later they switched to a more modern Z-shape (right). An expert has told me that the claws on the left were on George Hayman kits. But mine is certainly simply a Hayman (no George on the badges).

The Hayman (no George) brass badge patent numbers clearly say 1968 and 1969.  According to wikipedia, "each round badge on a Hayman drum has a patent number - giving the year of manufacture within the patent number."

(claw photos from eBay, thanks to Pete's Drum World)

Another piece of evidence putting my kit to the first years of Hayman drums is shell crazing. It seems earlier Hayman kits tend to craze more than later, and mine is rather crazed (the floor tom most of all, but also the kick). Allegedly it took them time to perfect the paint.


History of the kit
All I know is that it arrived from Glasgow via a nice guy named Davy who used to play with a Glaswegian outfit called Baby Chaos.  You can see Davy on the exact same kit on a few of their tracks on YouTube.
Here are some shots from before the clean-up. Luckily that sticker came off the kick with ease.


Monday, November 26, 2012

Blue Badge Beverley Drums, Vintage (early 1970s)

After playing my buddy's Rogers Holiday, I became determined to score a vintage kit of my own. After drooling over kits on American eBay for weeks and fretting over the risks and costs of shipping overseas, I decided it would be easier to find a kit locally, here in Europe where I'm living (Hungary, to be precise).

Pretty quickly I made the move on a rather obscure kit out of England called Beverley. Or as it is written on the blue badge: BeVeRLeY OF ENGLAND.

Before making a move I read dozens of posts about Beverley drums on various sites to convince myself that "Blue Badge Beverley" kits from the late 60's are professional kits. I read great comments about the supraphonic-like aluminum Beverley 21 (or Cosmic 21) snare, one of which was included in the local offering.

Here's the kit in a nice little track from my current band. It features the main kit without the 13, but with the Cosmic 21 snare. The 12" had a Renaissance Remo head, while the 16" a coated Ambassador.


So here's the word on my Blue Badge Beverley, after a couple of weeks in my possession. It was sold to me as a 1968 kit, though I have no way to prove that. UPDATE: This kit seems to be at least a 1974 kit. The oval-shaped "lokfast" tom mount seems to have only been introduced in the 70's:
These lasted until roughly 1974 when they were replaced by the more substantial ones (confusingly called Lokfast), which we’re probably all familiar with. These had an oval down-tube, knurled L-arms, and a massive cast receiver block on the bass. 
source: http://www.drummagazine.com/gear/print/the-rocky-history-of-premier-drums


Set-up and sizes
12 x 8, 13 x 9, 16 x 15 (yes, 16 x 15!), 22 x 14, with a 5 x 14 Cosmic 21 snare
The 13 actually has a stamp on the inside that says International Size. I consider that pretty cool!

Shells 
The drums are Premier 3-ply birch with beech re-rings. All, that is, except for the 12", which is a Premier mahogany shell with beech re-rings. Clearly they are matching drums, wrapped at the same time. Don't ask me how or why the 12 is mahogany, though it makes sense according to my research. That is, Premier started to move to mahogany around this time, so I guess somehow this kit got made with a mahogany 12". Go figure. Anyway, all of the shells are perfectly round with no signs of any problems whatsoever with the bearing edges.  The Cosmic 21 snare is aluminum (or aluminium, if you prefer).

Interestingly, the floor tom seems to have a sandwich layer of darker wood, presumably mahogany. I've yet to find info about Premier using a sandwich shell of birch-mahogany-birch, but you can clearly see a dark ply in this photo.

Update: Here's a link to a site that mentions a middle-ply of "darker wood" on Olympic (Premier) shells: http://www.vintageolympic.co.uk/faq.html#q2


Wrap 
The wrap itself might officially be known as Hairline Silver, but I'm not sure.

Update: A fellow VintageDrumForum user informs me that the name of this wrap is Silver Star.

Whatever it's called, it's certainly silver and textured and very cool (clearly a subjective view, though). I had read on one forum that Beverley kits had thin wrap. This is certainly what I would call a light wrap, or maybe soft is a better word. It's not a hard plastic wrap, but almost more of a fabric-like wrap. Instead of cracking, this wrap scratches like a thick industrial wallpaper, you might say. The wrap is a bit bubbled in a few places, mainly on the 12". But you have to look closely to notice.


Badges, Serial Numbers
My band mate noticed that at a certain angle you can see a serial number printed on the each blue badge. I'll have to write them down and post them here.


Chrome.
Probably the most surprising thing about the Beverley is the chrome. Even close-up there's hardly a spot on the chrome. On some sites I read that Beverley was first known for music stands, so I guess it makes sense that the chrome is top-notch. Even the Cosmic 21 is almost flawless, but I've seen some 21's in rough shape online.

Hoops/Rims
So far this is the weak spot. The hoops are rather light, and the 12" hoops are out-of-round where the drum seems to have been dropped. The 13" is also slightly dented. I think I read somewhere that these are 2.3mm hoops, but they are not as solid as the steel rims on my new Natal, for example.  I replaced the 12" with standard Gibraltar 2.3mm hoops and it's sounding fine. Update: I also changed the 13 and 16 just to keep everything the same. Naturally I've stored away the originals.

Lugs
Somewhere on a forum someone described Beverley lugs as "space age", and I'd have to say that's fair. We're talking Sputnik 1957 space age. The one practical problem I discovered with the otherwise stylish and well-chromed lugs is that they are positioned close to the hoop and have an upward pointing "tail" that makes it hard to finger-tighten the rods. In other words, my fingers don't fit in the space between the lug and the hoop. And it's not like I have fat fingers.

Tension rods
It seems Beverley drums always came with slotted-tension rods, and mine is no exception. The original rods are in excellent shape. I got a Sonor key, so I can manage alright.  Some guys suggest that the Sonor key is not ideal on English slotted rods, and I'd have to say I agree. The Sonor key works, but it's not a perfect fit.

Strainer on the 21
The strainer is a bit flawed. You have to pull the knob up a bit before pulling the lever, and sometimes it slips off during play. Not good. I need to spend some time debugging it, you might say. UPDATE: A little teflon lubricant fixed the strainer! Easy as that.

Tom mount
Originally I had trouble figuring out how to position two rack toms mounted on the kick, but with some suffering and experimentation I managed to figure out how to get the best out of the rather old fashioned hardware. I guess this is why Keith Moon preferred  Rogers Swiv-O-Matic to any of the mounting available out of the the UK at the time?

Sound... 
Fantastic! Watch the video and listen to "Raven Girl" and decide for yourself (see above).

Beverley in the USA
My research tells me that these kits were sold in the late 70's in the US as Premier Powerhouse 6500 and Premier Kicker 6400. Same as the Beverley kits from the same period, as far as I can tell, with some variation over time (kick spurs, for example).
  • Premier Powerhouse 1975 from Vintage Drum Guide 
  • Premier Kicker 1977 from Vintage Drum Guide 
  • After the demise of the Beverley name, it seems the kits became marketed as Premier Projector (catalog ZIP from drumarchive.com)
  • Projectors have Beverley kick-drum sized lugs on all drums, including toms (the lugs have one type of insert for kick and one for toms in order to allow proper spacing between rim/hoop and rod)
  • The later Soundwave is not the same as Beverley

Playlist on YouTube
I started a playlist of videos featuring vintage Beverley drums.
Feel free to add to it!


Here's some random banging showing the toms with wide open medium tuning and the Cosmic tuned somewhat lower than I play it now (not intended as a solo).